05. Mac OS X 10.6 Snow Leopard Setup


The following images describe the progression for dealing with the initial setup of new Intel Snow Leopard hardware. When you first boot a new Mac you are presented with a series of setup choices, options and dialogs. We’d like to make sure you do it the same way every time and this guide will help. It is advisable to read through the entire guide before doing the steps. It’s shorter than you think and will save you missing steps and bad order of execution, which can be harder to undo.
Boot the new computer. You should soon see the image on the left Showing The Apple Logo and a progress gear below it. You may be prompted to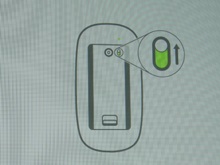 make a selections appropriate to your equipment.
Apple Wireless keyboard and mice users will get prompting to turn them on. No prompting of this kind for standard Apple wired keyboards so if you don’t have these wireless products, you can skip past this section. The image on the right means the mac is looking for your mouse. The image below also shows where the switch for the mouse is located. It may even speak to you if you wait long enough.
Some of the setup steps you see on screen do use the speech capabilities of the Mac for the visually impaired. Turn the mouse over, and you will the illustrated switch on the back. Also look for the power switch on wireless keyboards on their right edge. Please allow 3 to 6 seconds for Mac to recognize these and any peripherals. When  switching any peripheral on it can take a moment to be recognized. Be patient while this is sorted out. Mac will tell you if it has trouble.
A similar image may appear for your keyboard. If you have difficulty getting your wireless products to connect, attach a wired mouse and keyboard to bypass the issue for the remainder of this guide. Wireless devices 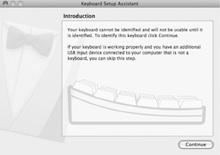 can be connected and configured at any time so you shouldn’t worry about it. Of course there is no way for the Apple OS to recognize third party wireless devices while setting up, but it can understand wired keyboards.
If so, you get a setup screen like the one pictured to the right telling you that your keyboard cannot be identified. This message appears when you attach a Windows PC keyboard or other third party keyboard that Mac doesn’t recognize by default.
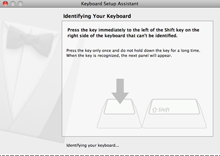
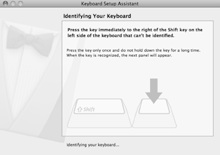
This sequence of screens sorts that out by asking that you strike the button to the right of the left shift key (left image), after which it will ask you to strike the button to the left of the right shift key (right image). Read carefully or the keyboard may not be usable or may behave unexpectedly and you’ll have to reconnect it to try again.
This last setup screen can be confusing. It usually comes up with a correct default and in the USA 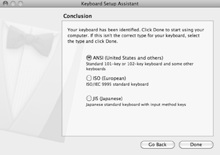 should be set to ANSI. Click “Done”.
You have completed the setup of the keyboard.
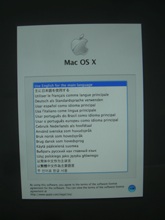
Now you are asked to choose your Language.
I recommend English.
This starts the “Welcome” animation, so turn the volume down, Its designed to show off the loudspeaker and sound capability of the Mac, but it can be obnoxious.
Of course there is no reason not to enjoy it if your office environment is conducive to it, but I thought you should be warned in advance.
When the welcome animation competes (no you cannot bypass it) you will get a “Welcome” screen. This is where regional and country settings are chosen to accompany the earlier language choice. They should not conflict. I have to recommend United States. Make a selection and click “Continue.”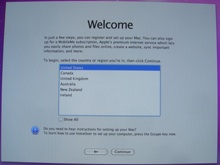
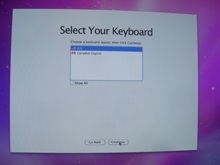
Next you will be asked to “Select your keyboard” which tells the system more about your hardware. English perhaps?
This will be followed by a screen asking “Do you already own a Mac? It will offer to move your information to this Mac from the old one. Even if this is your intention, its best to wait until after you have established and created an administrator’s account, which is not only recommended but required for our procedure to be correct and secure.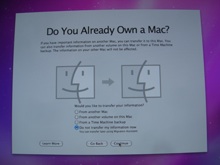
Choose “Do not transfer my information now” which is the last choice. The option to move your information from an older Mac is available at any time using the Migration Assistant. If there is no account to migrate this would not be required.
Click “Continue” to move to the next screen.
Your new Mac no doubt has WiFi capabilities which would produce the option to join networks found in range. For our purposes, network connectivity will not be needed until later. Choose the button on the bottom that states, “Different Network Setup.”
Again note that this does not prevent joining Wireless network at any later time, so skipping it in this guide will allow us to quickly get our Mac up and running.
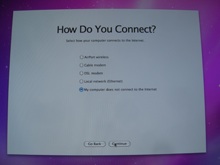
You will be asked, “How do you connect?” Again for the sake of speed and knowing this can be done easily later, choose “My computer does not connect to the internet.” and click “Continue.”
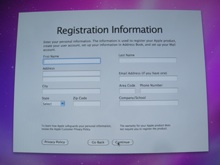
Next a “Registration Information” screen begs you to reveal all manner of personal information.
We don’t have to do that. Save time, and skip it. To do that, depress and hold the “Command” key while striking the letter “Q” to quite out of the Registration screen. (The command key is the key with the Apple icon).

Macintosh will protest, warning you that you have not finished setting up! No need to worry. The warning sounds worse than it is. By clicking the “Skip” button, you can proceed to set up the Administrator’s Account.
Now you are asked to “Create your account,” and this is where most users make the mistake of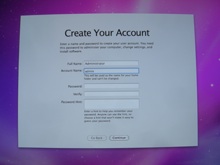 setting up their only account as an “Administrator”. An Administrator has the ability to manipulate everything on the system. This can be good and bad. This is your chance to make it right!
By making an Administrator account first, and your account as a less privileged “Standard” account later, you separate perfectly the difference between what is safe for you to do every day as a user, and the more advanced or even risky steps of making deeper changes to the system as an “Administrator.”
Most users feel uncomfortable if their user name and password does not allow them to do anything they wish on their computer. After all, it is their computer, isn’t it?
This sense of comfort is a false one. Having to enter a different user name and password for advanced functions is inconvenient, but the alternative means that the account they use every day for every thing is capable of deep manipulation of system parameters. It is best to separate them because you will be asked for an “Administrator” password differently than your Account password. This means you will easily be able to tell when you are about to do something that is significantly deeper or more technical.
You can use the administrator’s power and credentials from your “Standard” account and you might not need to visit the administrator account very often, but by simply having a stronger, more difficult password for that user over your own simpler one, you make it more difficult for accidents and hacking to happen without you noticing it.
The “Crete your account” screen will need only two pieces of information: First, a user name known also as “Full Name.” Then a short version of it known as “Account Name”
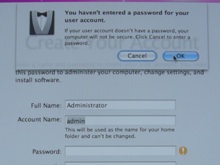
Pictured here is the common use of “Administrator” for the full name, and “admin” as the short name. Then click “Continue.”
A warning dialog appears notifying you that “You haven’t entered a password for your user account.” You can click “OK” in this dialog to proceed without a password. A password can be assigned to the Administrator account at any later time. Right now we are focusing on setting up quickly. When we have finished building our Administrator account we will put in a password. Right now it would just slow us down.

Now you are prompted to “Select a Timezone.”
Disable the checkbox for “Set timezone automatically using current location” and choose a city below the map. You may have to start typing a major metropolitan area near you, such as “New York” or “Los Angeles” or “Atlanta” for example.
When your selection is complete, click “Continue.”

The next screen asks that you “Set the date and time” Often it is already correct. If it is not please feel free to set it now. Automatic setting of the date and time can be done at a later time, using the “Date and Time” System Preference Pane.![]()
The next screen reminds you, “Don’t forget to Register” which is true, but you don’t have to use the setup process to do that, so you see we could put off those decisions until a later time. You are done getting the system fudamentally constructed, and can now click the satisfying “Done” button.

This presents you the administrator’s desktop.
In the steps that follow we will be going over essential tools and utilities to set up for Administrator use.
Install Essential Applications and Utilities for the Admin on the next page
©℗ 1986-2013 Silence. All rights reserved. Registered trade and service marks are the property of their holders, may not be reproduced without the holders express permission and are used by permission or as editorial content and for review.